Being able to migrate our data freely between open platforms is all well and good in theory, but when every service uses its own opinionated data format, it can feel like the option might as well not even be there. What good is all this data if no two sites speak the same language?
Well, here's one translation. I don't figure the number of people in need of this guide is very large, but if you're one of those people, I hope you can benefit from what I learned. This guide relies on bespoke tools that others have made; if these tools are made unavailable in the future, I'll update this post with the bad news. For the moment, this process, convoluted though it may be, works.
💡Prerequisites
bash, curl, a text editor that supports find-and-replace with regular expressions (I use gedit)
Step 0: download your bearblog archive
Before you begin, it's prudent to save a backup of your bearblog archive in its current form in case anything goes wrong. Go to your bearblog settings page at https://bearblog.dev/<your subdomain>/dashboard/settings/ and click "export all blog data". This will give you a file called post_export.csv. This is your archival copy: keep it safe and back it up like you would any private data you don't want to lose.
Step 1: clean up your bearblog archive
This process will migrate your entire bearblog catalog to mataroa, including drafts and pages that may not be intended for the public. If there's anything you don't want to migrate, now is the easiest time to deal with it. You can delete posts you don't want to keep, or to preserve them, you can set the published date far in the future. This will make them scheduled posts on mataroa, not visible to the public,1 so you can deal with them at your leisure.
Step 2: download your bearblog archive
Go to your bearblog settings page at https://bearblog.dev/<your subdomain>/dashboard/settings/ and click "export all blog data". This will give you a file called post_export.csv. This is your working copy, the archive that will be copied in its entirety (sans tags and other unsupported metadata) to mataroa.
Step 3: fix the date stamps
Mataroa's API will only accepts posts with a published date in YYYY-MM-DD format. Bearblog dates also include a timestamp. We need to fix this.
Open post_export.csv in an editor that supports find-and-replace with regular expressions. gedit works fine for this purpose.
Open the find-and-replace dialogue (Ctrl-H in gedit) and make sure regular expression search is enabled. In the "find" field, paste this:
T\d\d\:\d\d\:\d\d(\.\d\d\d\d\d\d\+\d\d\:\d\d|\+\d\d\:\d\d)
Leave the "replace" field blank and click Replace All. This will strip the time from each of the date stamps, leaving only the date in YYYY-MM-DD format. Save the file and close the editor.
Step 4: convert your archive to JSON
I used a tool called nanuq. Go to mgx.me/nanuq.
Under customize headers, change "published date" to "published_at" and "content" to "body". Leave all the other fields unchanged.
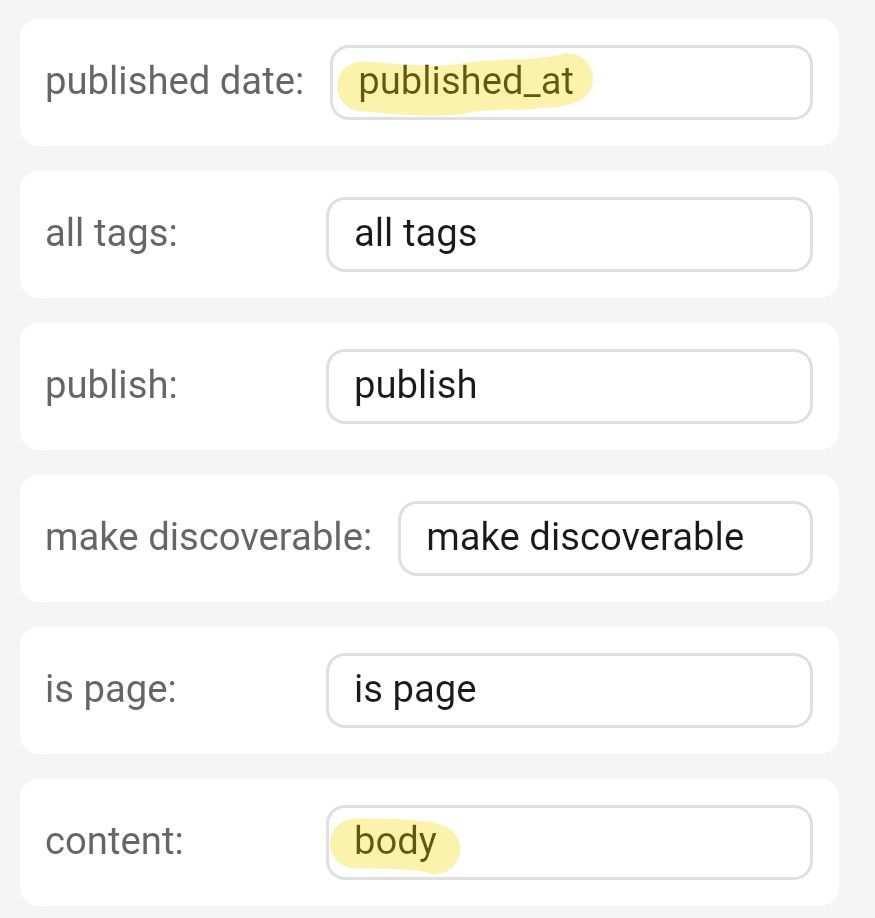
Bear uses a lot of metadata that's not applicable to mataroa, so under select fields to include, the only boxes that should be checked are title, slug, published date and content.
💡Correction
The mataroa API doesn't allow for importing custom slugs, it'll just automatically generate them based on the title. All you need are title, published date and content.

Scroll down to export options. Click choose file and find the post_export.csv file you got from bearblog. Click export JSON.
Nanuq will then give you a file called post_export.json.
Step 5: split the JSON file
💡 Alternative method
Instead of the program I recommend here, you can split your JSON archive manually with the POSIX commands
sedandcsplit. More information in the follow-up post.
The mataroa API unfortunately doesn't let you import multiple posts in one .json,2 so you'll need to split it up. For this I used a program called DataFileSplitter.3 Launch it and click New Task.
On the Select Convert Type screen, you want File, JSON and Object Count/Column Value.
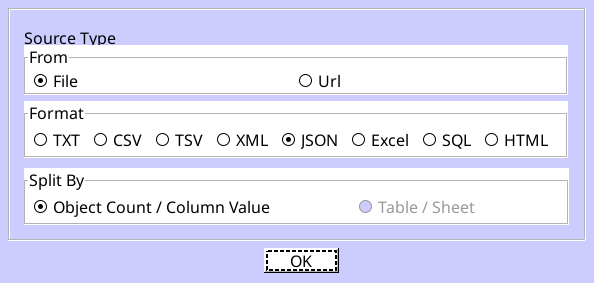
Click OK. On the next screen, click the button beside Open a JSON file and browse for your post_export.json file. You don't need to change anything on this screen, so click Next.
The To Folder field shows you where the program will place your individual .json files. You can change this if you wish. Make sure Split by object count is selected and the value is set to 1.
For the JSON Format field, select JSON Lines.

Click Next and then Next again, then click OK. It should complete the task nearly instantly. You may now close DataFileSplitter.
Step 6: find your mataroa API key
Go to the mataroa API docs page. At the top, you should see your API key, a long string of letters and numbers like 0a1b2c3d4e5f6a7b8c9d0e1f2a3… If you don't, make sure you're logged in. Have this key ready for the next step.
Step 7: import your posts
Navigate to the folder where you saved the split .json files in step 5. Create a new text file for a bash script. I called mine import.sh.
Copy and paste this script into the file:
for i in {001..999}
do
    json="@post_export_"$i".json"
    curl -X POST \
    -H 'Authorization: Bearer <api_key>' \
    -d $json \
    https://mataroa.blog/api/posts/
    sleep 5
done
Replace 999 with the number of posts you're going to import. If you have a two-digit number of posts, remove one of the leading zeroes, for example {01..99} (if you have a single-digit number of posts, you probably don't need this guide!)
Replace <api_key> with the key you found in step 6.
Save the script. Make it executable with chmod +x import.sh. Start the script by typing ./import.sh.
The script will begin importing your posts with the mataroa API. There will be a 5 second pause between each request so as not to hammer the server. Wait for it to finish. Your blog is now migrated!
Problems
The only issue I noticed is that I got an "invalid data" error with a few posts towards the end of the process. Turns out that for some reason, quotation marks in the body of the post weren't escaped. I don't know if this originates with the bear blog export itself or the .json conversion. It's easy enough to fix: place a backslash before any quotation mark in the body field \"like this\". Considering this only happened to like 4 posts out of nearly 400, I think it did a pretty good job.
There may be ways to streamline this process. I thought since DataFileSplitter has a "date format" option in the columns map, it might be able to fix the date stamps on its own and save a step, but entering yyyy-mm-dd in that field doesn't seem to have any effect. I may be doing something wrong.
Having to rely on a web app and a free trial of a commercial program isn't ideal. If you know of open-source utilities that can accomplish the same thing, or if you have any questions or suggestions, please let me know in the comments.
Also, please let me know if this helped! It took me hours to put this all together, so I hope this guide is useful to someone.
-
I've since learned that drafts and scheduled posts on mataroa are visible to anyone who knows the URL, they're just not indexed. So if you keep your sensitive data in a post with a simple URL like
nudes, it's possible for someone to access these posts by guessing. Exercise caution. ↩ -
Or if it does, the docs don't say how and I can't figure out how to format it in a way that the API will accept. This is the first time I've worked with JSON so there may be something I'm missing. ↩
-
I'm not thrilled about recommending a free trial of an expensive program, but this is the only application I've found that will split the data in precisely the way that's needed (one
.jsonfile per post.) If a better option exists please let me know. ↩